In this article, we will explain what RabbitMQ is, how it works, what challenges and problems exist in the implementation process, and how to implement RabbitMQ into a .NET application.
What is RabbitMQ?
RabbitMQ is an open-source message broker software that implements the Advanced Message Queuing Protocol (AMQP).
How does RabbitMQ work?
RabbitMQ is like a post office for computer programs. When one program wants to send a message to another program, it sends it to a special place called an Exchange. The Exchange is like the post office sorting room where the Message is sorted and sent to the right place.
The Message is then sent to a Queue, which is like a mailbox. The program that is supposed to receive the Message, called the Consumer, can now pick up the Message from the Queue. So the publisher sends the Message to the Exchange, the Exchange sends it to the right Queue, and then the Consumer picks it up from the Queue.
This way, the Publisher and Consumer don’t have to know about each other and can communicate through messages. RabbitMQ takes care of sending the messages to the right place and making sure they get there safely.
An example of use in a real application
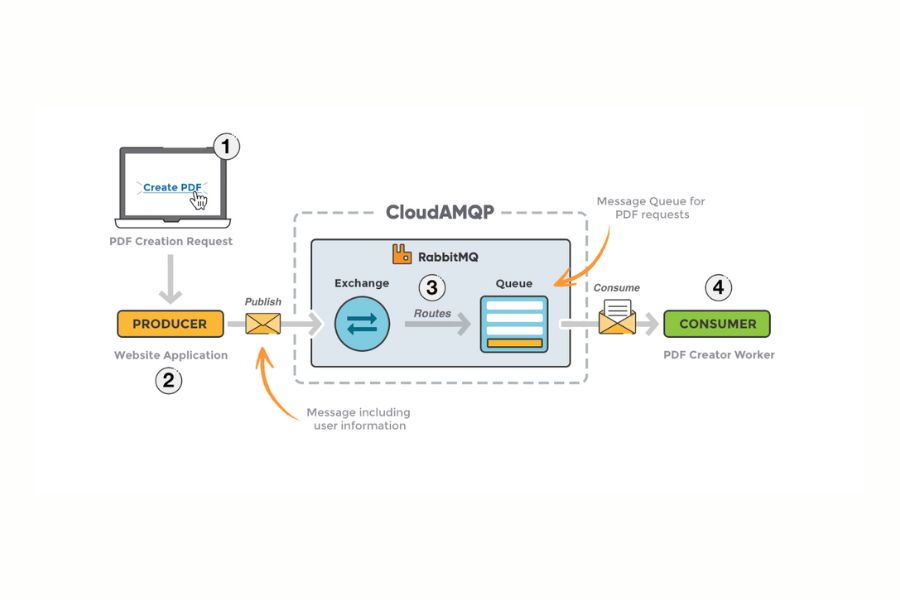
Imagine you have an application that allows users to request the creation of PDF files. When a user submits a request to create a PDF, it can be sent to a RabbitMQ queue for processing. This can be beneficial for several reasons:
- Scalability: By sending PDF creation requests to a queue, the application can handle a large number of requests without slowing down. Multiple consumers can handle the PDF creation process, each taking a request from the Queue and processing it in parallel. This allows the application to handle a high volume of requests without overloading the system.
- Asynchronous: By sending the request to the Queue, the user does not have to wait for the PDF creation process to complete before receiving a response. This improves the user experience as the user can continue to use the application while the PDF is being created.
- Decoupling: The PDF creation process can be decoupled from the main application. This means that if the PDF creation process needs to be created, updated or changed, it can be done without affecting the main application.
In this scenario, using RabbitMQ allows the application to handle a large number of PDF creation requests in a scalable, decoupled, and asynchronous way. This can improve the performance and user experience of the application. If you want to learn more about RabbitMQ, check out this GitHub repository: https://github.com/sipodsoftware/rabbitmq-example.
RabbitMQ concepts
Some important concepts need to be described before we dig deeper into RabbitMQ.
- Producer: Application that sends the messages.
- Consumer: Application that receives the messages.
- Message: Information that is sent from the producer to a consumer through RabbitMQ.
- Queue: Buffer that stores messages.
- Exchange: Receives messages from producers and pushes them to queues depending on rules defined by the exchange type. To receive messages, a queue needs to be bound to at least one exchange.
- Binding: A binding is a link between a queue and an exchange.
- Routing key: A key that the exchange looks at to decide how to route the message to queues. Think of the routing key like an address for the message.
- Connection: A TCP connection between your application and the RabbitMQ broker.
- Channel: A virtual connection inside a connection. When publishing or consuming messages from a queue – it’s all done over a channel.
- AMQP: Advanced Message Queuing Protocol is the protocol used by RabbitMQ for messaging.
- Users: It is possible to connect to RabbitMQ with a given username and password. Every user can be assigned permissions such as rights to read, write and configure privileges within the instance. Users can also be assigned permissions for specific virtual hosts.
Type of exchanges
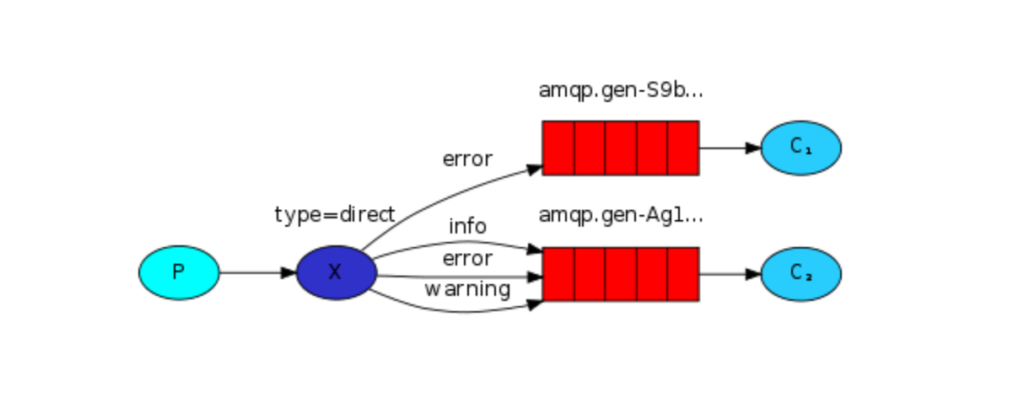
#1 Direct Exchange
The direct exchange routes messages to queues based on the message routing key. This is the simplest and most common type of exchange. It’s like sending a letter to a specific address, the letter will be delivered only to that specific address. A direct exchange can function similarly to a fanout exchange if multiple queues are bound to it with the same routing key. In this case, messages sent to the exchange with that routing key will be routed to all queues bound with the same routing key.
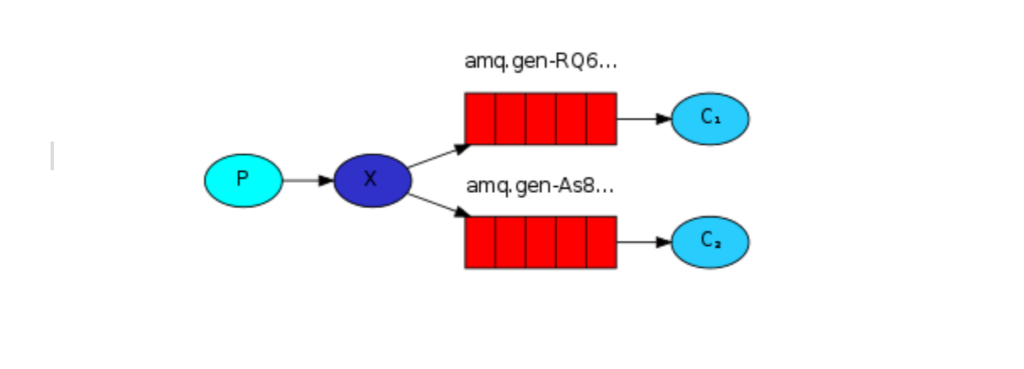
#2 Fanout Exchange
The fanout exchange routes messages to all queues that are bound to it. It’s like sending a letter to a post office box, and all the people who have a key to that box will get it.
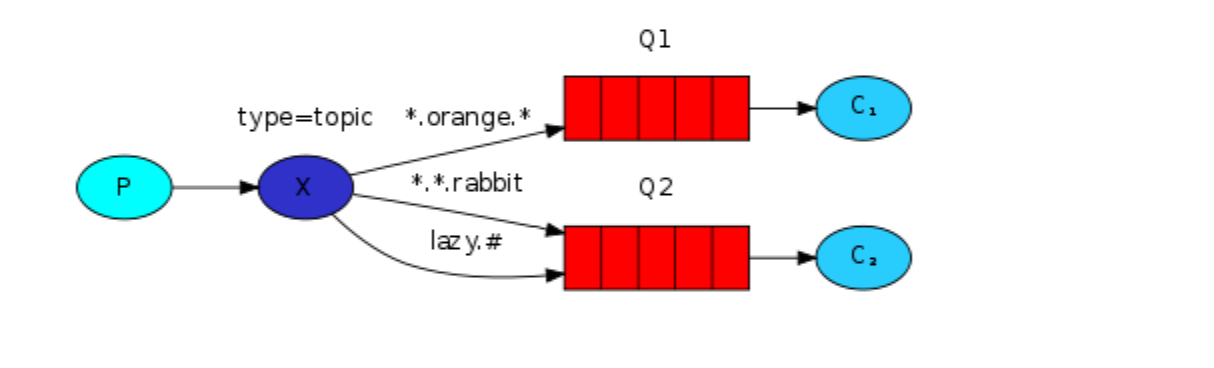
#3 Topic Exchange
The topic exchange routes messages to queues based on a pattern that the queue and message routing key must match. This type of exchange is like sending a letter with a specific topic and only the people who are interested in that topic will get the letter.
Implementation in .NET application
#1 RabbitMQ Client
First, you need to install the RabbitMQ client NuGet package :
#2 Run RabbitMQ server on Docker
In order to run the RabbitMQ server via Docker, you must have Docker installed on your computer.
You can download it from the following : https://www.docker.com/products/docker-desktop/
To download and run RabbitMQ in Docker, you need to enter the following command in the command prompt:
docker run -d -it –hostname localhost -v C:\rabbitmq-data:/var/lib/rabbitmq -p 5672:5672 -p 15672:15672 rabbitmq:3-management
Docker command parameters:
docker run: This is the command to run a new container.
–d: This option specifies that the container should run in detached mode, which allows the container to run in the background.
-it: This specifies that this container should run in interactive mode, allowing you to see the logs and providing the ability to stop the container.
-hostname localhost: This option allows you to specify a custom hostname for the container, in this case it’s set to “localhost”
-v C:\rabbitmq-data:/var/lib/rabbitmq: This option mounts the local folder C:\rabbitmq-data on the host machine to the /var/lib/rabbitmq directory within the container. This will ensure that any data stored in the /var/lib/rabbitmq directory within the container will be stored in the local folder C:\rabbitmq-data, and will persist even if the container is deleted.
-p 5672:5672 -p 15672:15672: This option maps the host ports to the container ports. The -p flag is used for port mapping, it takes two arguments. The first argument is the host port, and the second argument is the container port. In this example, it maps the host port 5672 to container port 5672, and host port 15672 to container port 15672. This will expose ports 5672 and 15672 on the host, allowing you to access the RabbitMQ service and the management console, respectively.
rabbitmq:3-management: This is the image name, version, and tag (with the management plugin enabled) that you want to run in the container.
#3 Connect to RabbitMQ Server
A connection in RabbitMQ is a way for your application to communicate with the RabbitMQ server. It is the first step in sending or receiving messages through RabbitMQ. Once a connection is established, channels can be opened on it to send or receive messages.
Connections are meant to be long-lived. The underlying protocol is designed and optimized for long-running connections. That means that opening a new connection per operation, e.g., a message published, is unnecessary and strongly discouraged as it will introduce a lot of network round trips and overhead.
The conclusion is it is best to have one connection and reuse it. Channels for each operation should be opened and closed, but consumers should keep their channels open for better performance.
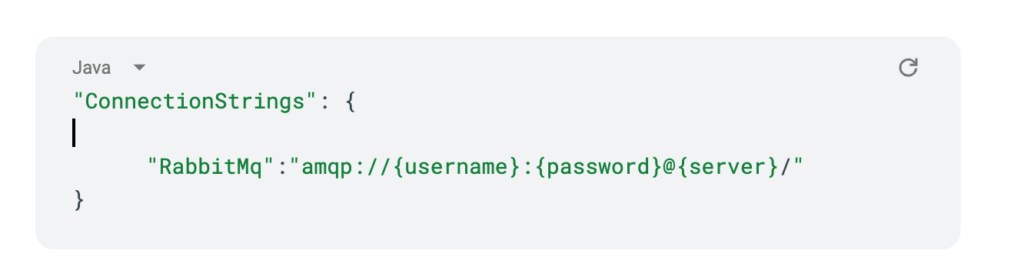
Connection string with default values:
Connection string parameters:
{username}: This is the username used to authenticate to the RabbitMQ broker. Replace this with the actual username for your installation.
{password}: This is the password used to authenticate to the RabbitMQ broker. Replace this with the actual password for your installation.
{server}: This is the hostname or IP address of the RabbitMQ broker. Replace this with the actual hostname or IP address of your installation.
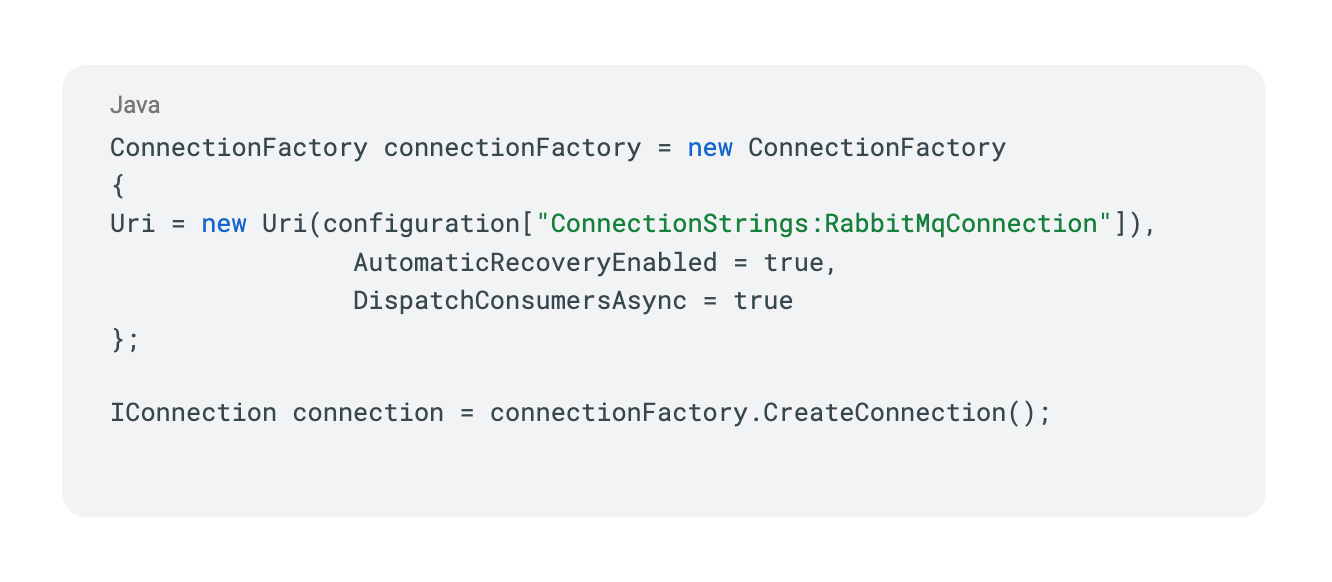
AutomaticRecoveryEnabled = true: Enables the automatic recovery feature of the connection factory. When automatic recovery is enabled, the connection factory will automatically attempt to recover connections that have been closed unexpectedly.
DispatchConsumersAsync = true: Enables the asynchronous dispatching of messages to consumers. This means that the messages will be delivered to the consumers on a separate thread, allowing the connection to handle multiple messages at the same time.
#4 Configure Queue
Before sending and receiving messages in RabbitMQ, it’s important to set up the necessary components, such as queues, exchanges, and bindings.
Both queues and exchanges in RabbitMQ are idempotent, meaning they will only be created if they do not exist. When a queue or exchange is declared with the same name as an existing one, the existing one is used, and no new one is created.
Therefore, it is a good practice to configure queues and exchanges before each use to ensure that the messaging infrastructure is properly set up and ready to handle messages.
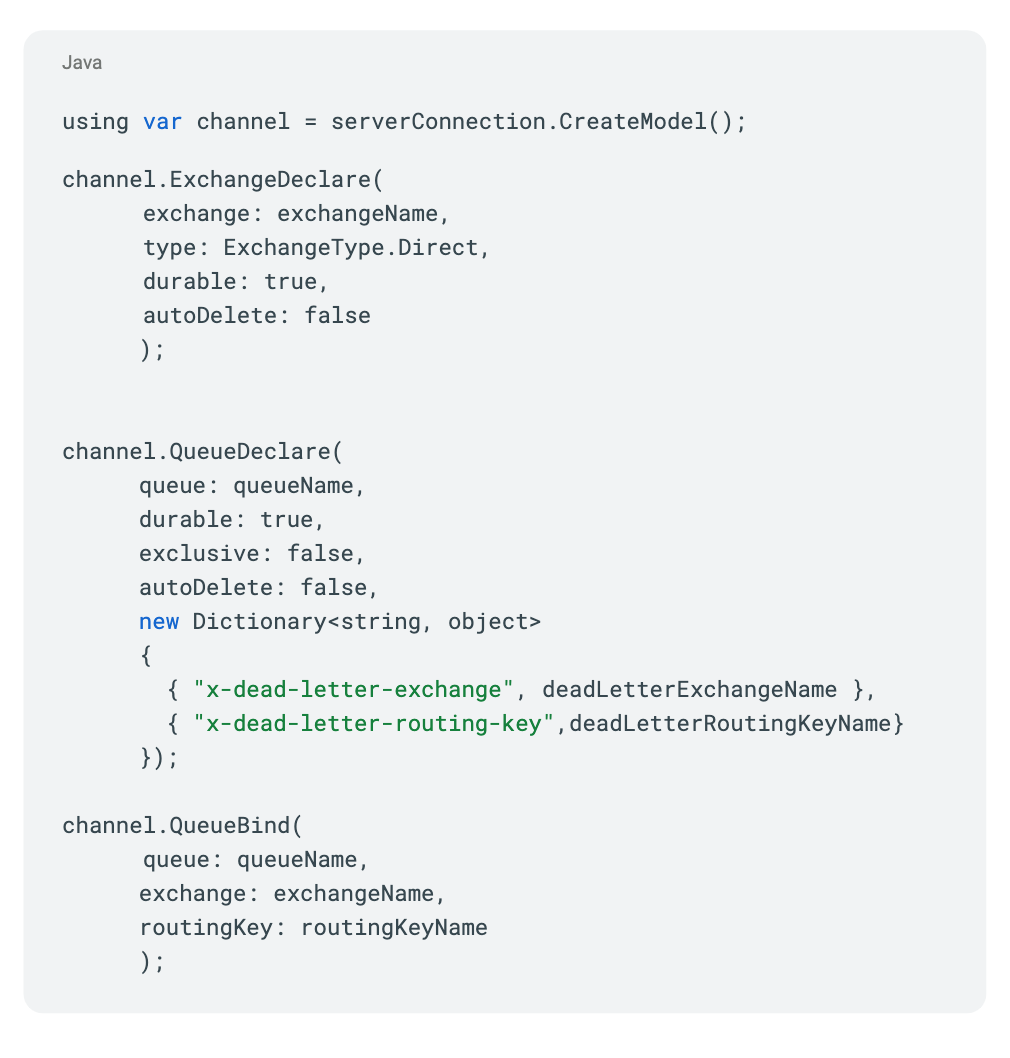
Declare parameters:
durable: If a queue is durable, it means that it will survive a (message queue server) restart.
exclusive: An exclusive queue is only accessible by the connection that declared it.
autodelete: An auto-delete queue will be deleted by the broker automatically when the last consumer unsubscribes.
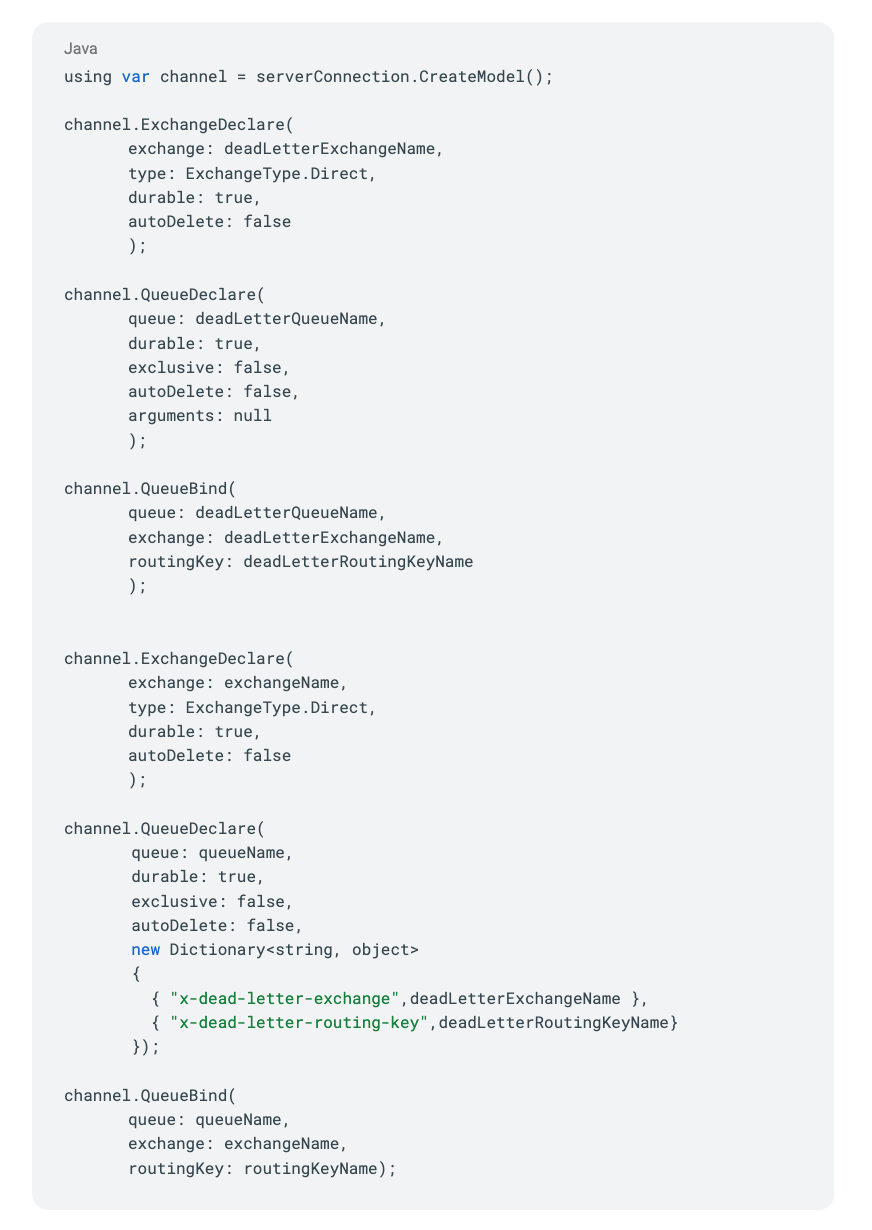
arguments: The arguments are additional options that might be specific to the message broker you are using. In our example, we define dead letters in arguments.
In the given example, we declare a queue and exchange and bind the queue to receive messages from a specific exchange via a routing key. It is important to note that we are also defining a dead letter queue for our queue. This is an automatic mechanism for dealing with failed messages. It is a good approach to create a dead letter queue for each queue that you create to ensure proper handling of failed messages. We will explain dead letter queues and queue durability in more detail in a later section.
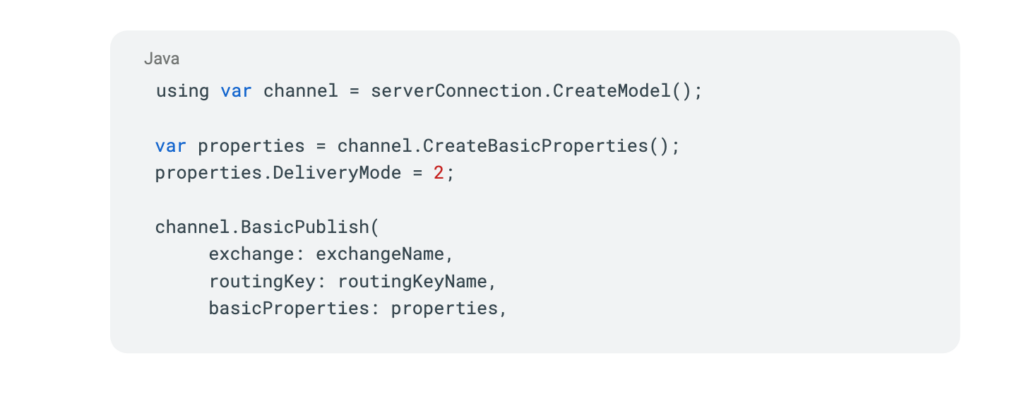
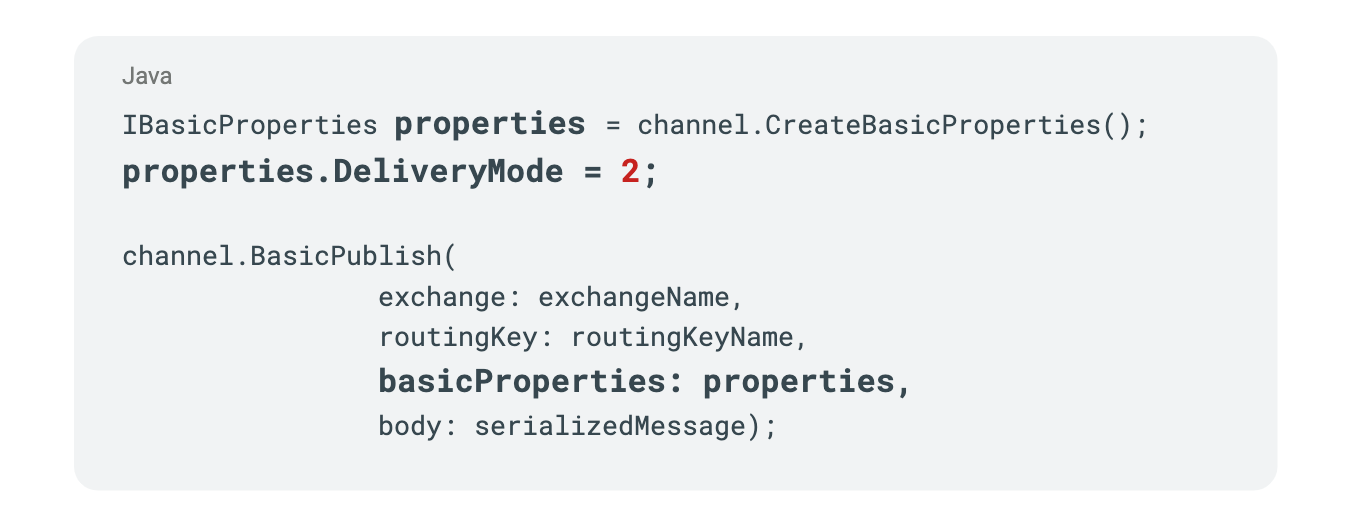
#5 Sending a Message to the Queue
After a previously successful connection and configuring the queue, we can send messages to the queue using the BasicPublish method. In this example, the message is sent to the exchange using the BasicPublish method, and the exchange will then forward the message to all queues that are bound to it with the specified routing key. The exchange uses the routing key to determine which queues the message should be sent to.
This allows messages to be directed to specific queues based on certain criteria, such as the message type or the intended recipient. In addition, it is important to note that the delivery mode set to 2 in the properties represents message durability, which means that the message will survive broker restarts. We will explain this concept in more detail later in the blog.
#6 Receive Messages from the Queue
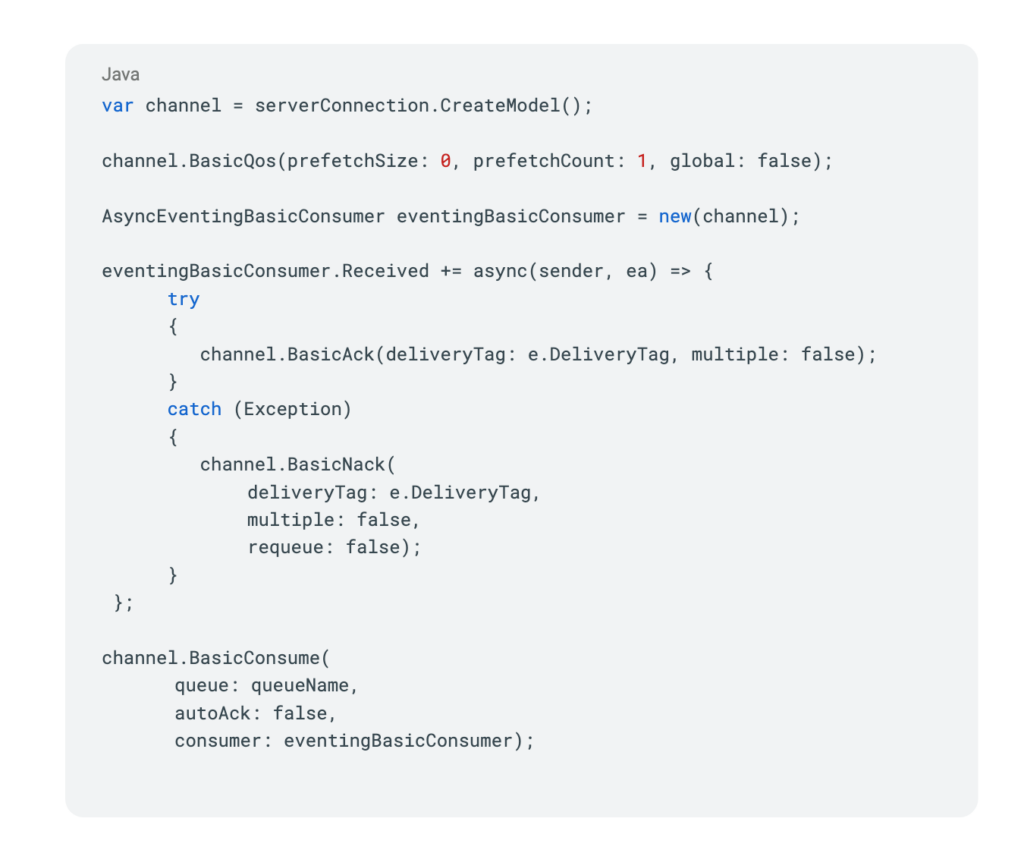
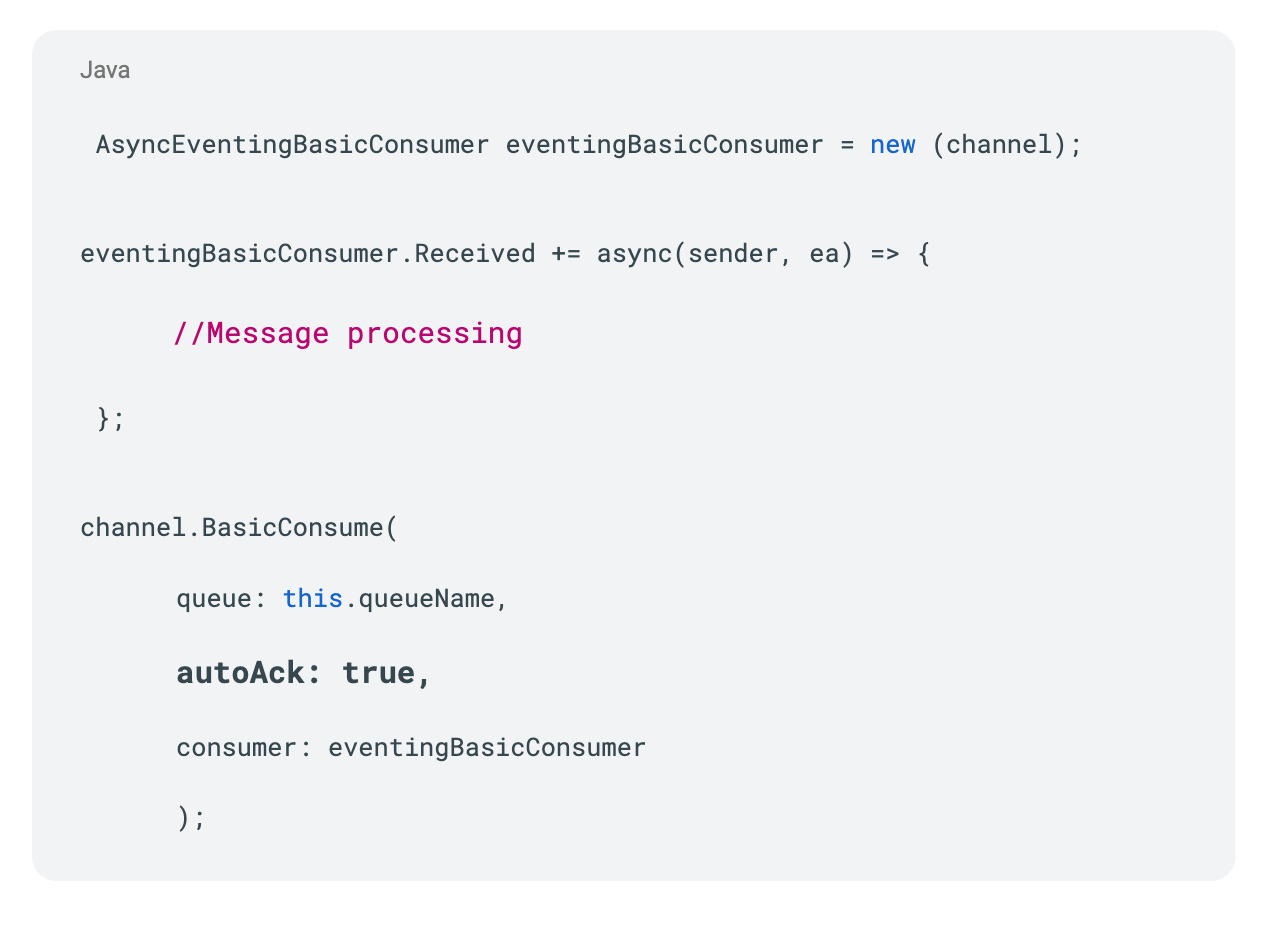
This example demonstrates how to consume messages from a queue in RabbitMQ using the BasicQos, AsyncEventingBasicConsumer, and BasicConsume methods.
The BasicQos method is used to configure the quality of service for the message, such as the order of receiving the message or fair dispatching.
The AsyncEventingBasicConsumer is a consumer that allows for handling messages asynchronously using events.
The Received event is where the actual handling of the message occurs, in this case, by acknowledging or negatively acknowledging the message using the BasicAck or BasicNack method.
Finally, the BasicConsume method starts consuming messages from the specified queue using the given consumer.
We will explain message acknowledgment and fair dispatching in more detail in a later section of the blog.
Advanced
#1 Message Durability
Message durability in RabbitMQ refers to the ability of messages to persist in the system, even if the server or a consumer goes down. This means that messages will not be lost if there is a power outage or other unexpected event.
To make messages durable in RabbitMQ, first, we need to make sure that the queue will survive a RabbitMQ node restart. In order to do so, we need to declare it as durable:
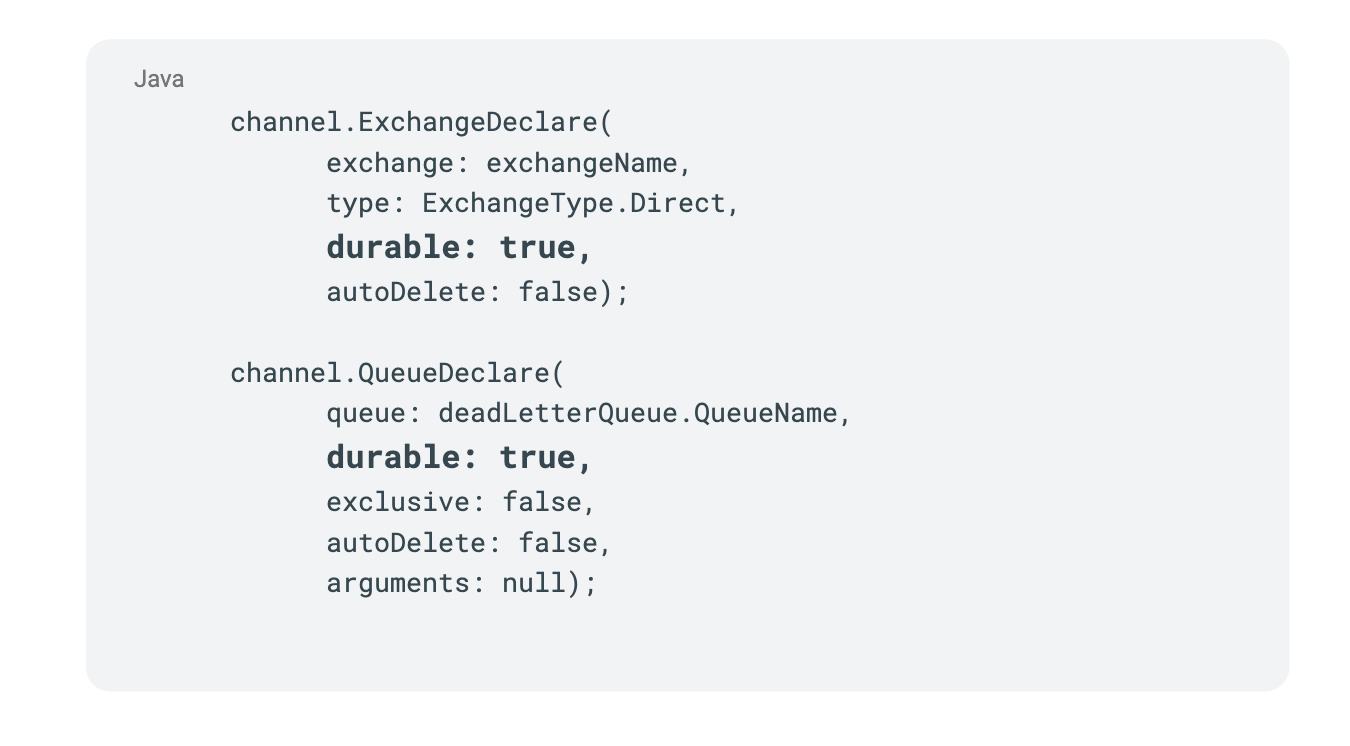
At this point, we’re sure that the queue won’t be lost even if RabbitMQ restarts. Now we need to mark our messages as persistent.
Another thing you can do to make sure the messages will be persisted even if the container or the server goes down, you need to use Docker Volume. When you run RabbitMQ in a Docker container, you can mount a host directory as a volume. This means that the data stored in the volume will persist even if the container is deleted. So, if you want to keep your messages durable, you should mount a volume to your RabbitMQ container, and configure your RabbitMQ to use that volume for message storage.
The use of volume is explained in the docker section, but you can learn more at the following link: https://docs.docker.com/storage/volumes/
#2 Dead Letter
Dead Letter Queue is a feature in RabbitMQ that provides a way to handle messages that can’t be delivered to their intended recipient or have encountered an error. It serves as a backup queue for messages that have either been negatively acknowledged or failed to process due to an error.
When a message can’t be delivered or has encountered an error, RabbitMQ will automatically move it to the Dead Letter Queue. This allows for inspection and possible re-processing of the message later. This feature can be useful for debugging and ensuring that important messages are not lost in the system.
To set up a Dead Letter Queue in RabbitMQ, you need to specify an alternate exchange and a dead-letter routing key when declaring a queue. The alternate exchange will receive messages that can’t be delivered to their intended recipient or have encountered an error, and the dead-letter routing key will determine which queue the messages will be delivered to.
In summary, the Dead Letter Queue is a crucial component of RabbitMQ that helps ensure that important messages are not lost and can be re-processed if necessary. Whether the message is negatively acknowledged or encounters an error during processing, it can be safely moved to the Dead Letter Queue for further examination.
In the following example, we create two exchanges and two queues. The first dead letter exchange and queue serve as the “backup” for messages that cannot be delivered or have errors. The second queue uses the dead letter exchange and sends messages that cannot be delivered to the dead letter queue. This setup ensures that important messages are not lost and can be easily retrieved for further examination or processing.
#3 Dispatching
Round Robin
Round Robin dispatching is a load-balancing strategy used in RabbitMQ. It works by distributing messages evenly across consumers in a queue. Each time a message is delivered, the next consumer in the queue will receive the next message. This ensures that no single consumer is overwhelmed and all consumers receive an equal share of messages. Round Robin dispatching helps to balance the workload and prevent bottlenecks in the message processing system.
Fair Dispatch
You might have noticed that the dispatching still doesn’t work exactly as we want. For example, in a situation with two workers, when all odd messages are heavy, and even messages are light, one worker will be constantly busy, and the other one will do hardly any work. Well, RabbitMQ doesn’t know anything about that and will still dispatch messages evenly.
This happens because RabbitMQ just dispatches a message when the message enters the queue. It doesn’t look at the number of unacknowledged messages for a consumer. It just blindly dispatches every n-th message to the n-th consumer.

In order to defeat that, we can use the Channel#basic_qos channel method with the prefetch_count=1 setting. This uses the basic.qos protocol method to tell RabbitMQ not to give more than one message to a worker at a time. Or, in other words, don’t dispatch a new message to a worker until it has processed and acknowledged the previous one. Instead, it will dispatch it to the next worker that is not still busy.

Order of Receiving
When prefetch_count is set to 1 in RabbitMQ and there is only one consumer, the messages in the queue are processed in the order that they arrived.
By setting prefetch_count to 1, RabbitMQ limits the number of unacknowledged messages that a consumer can have at any given time to 1. This means that the consumer can only receive and process one message at a time. Once the consumer has finished processing the message and sends an acknowledgment to RabbitMQ, the next message in the queue can be delivered.
In this way, basicQoS ensures that messages are processed in the order that they come to the queue, providing a consistent and predictable processing order. This can be particularly useful in applications where messages must be processed in a specific order, such as financial transactions or database updates.
#4 Delivering Unique Messages to Multiple Consumers
The publish/subscribe pattern in RabbitMQ is a messaging pattern where messages are sent from a publisher to multiple consumers through a message broker. In this pattern, the publisher sends a message to an exchange, which then distributes the message to all queues bound to it. Each queue has one or more consumers that receive the messages.
This pattern is useful when you want to send a unique message to several consumers. For example, if you have multiple consumers that need to receive a notification about a new order, you can send the message once and have it delivered to all consumers through the publish/subscribe pattern.
In RabbitMQ, you can implement the publish/subscribe pattern by declaring an exchange, creating queues, and binding the queues to the exchange. When a message is sent to the exchange, the exchange will distribute the message to all bound queues, and each consumer in the queues will receive a copy of the message.
In summary, the publish/subscribe pattern in RabbitMQ provides a way to send a unique message to multiple consumers, allowing you to distribute messages efficiently and effectively.
#5 Message Acknowledgment
Message acknowledgment in RabbitMQ refers to the process of confirming the receipt and successful processing of a message by a consumer. In RabbitMQ, messages are acknowledged by the consumer after they have processed the message. This process is essential for ensuring the reliability and durability of messages in the messaging system.
When a consumer receives a message from a queue, it processes the message and sends an acknowledgment to RabbitMQ. This acknowledgment tells RabbitMQ that the message has been successfully processed and can be removed from the queue. If the consumer crashes or fails to process the message, RabbitMQ will not receive an acknowledgment and will keep the message in the queue until it is processed successfully by another consumer. If no other consumer is available to process the message, RabbitMQ will move it to the Dead Letter Queue if it exists.
RabbitMQ has two types of message acknowledgment: automatic and manual. With automatic acknowledgment, RabbitMQ acknowledges messages automatically as soon as they are delivered to the consumer. With manual acknowledgment, the consumer must explicitly send an acknowledgment after processing the message.
In summary, message acknowledgment in RabbitMQ is the process of confirming the receipt and successful processing of messages by consumers. It is a key component of RabbitMQ’s messaging system and helps to ensure the reliability and durability of messages in the system.
Automatic Acknowledgement (autoAck : true) in RabbitMQ means that when a message is delivered to a consumer, it is automatically marked as acknowledged and removed from the queue without any action needed from the consumer.
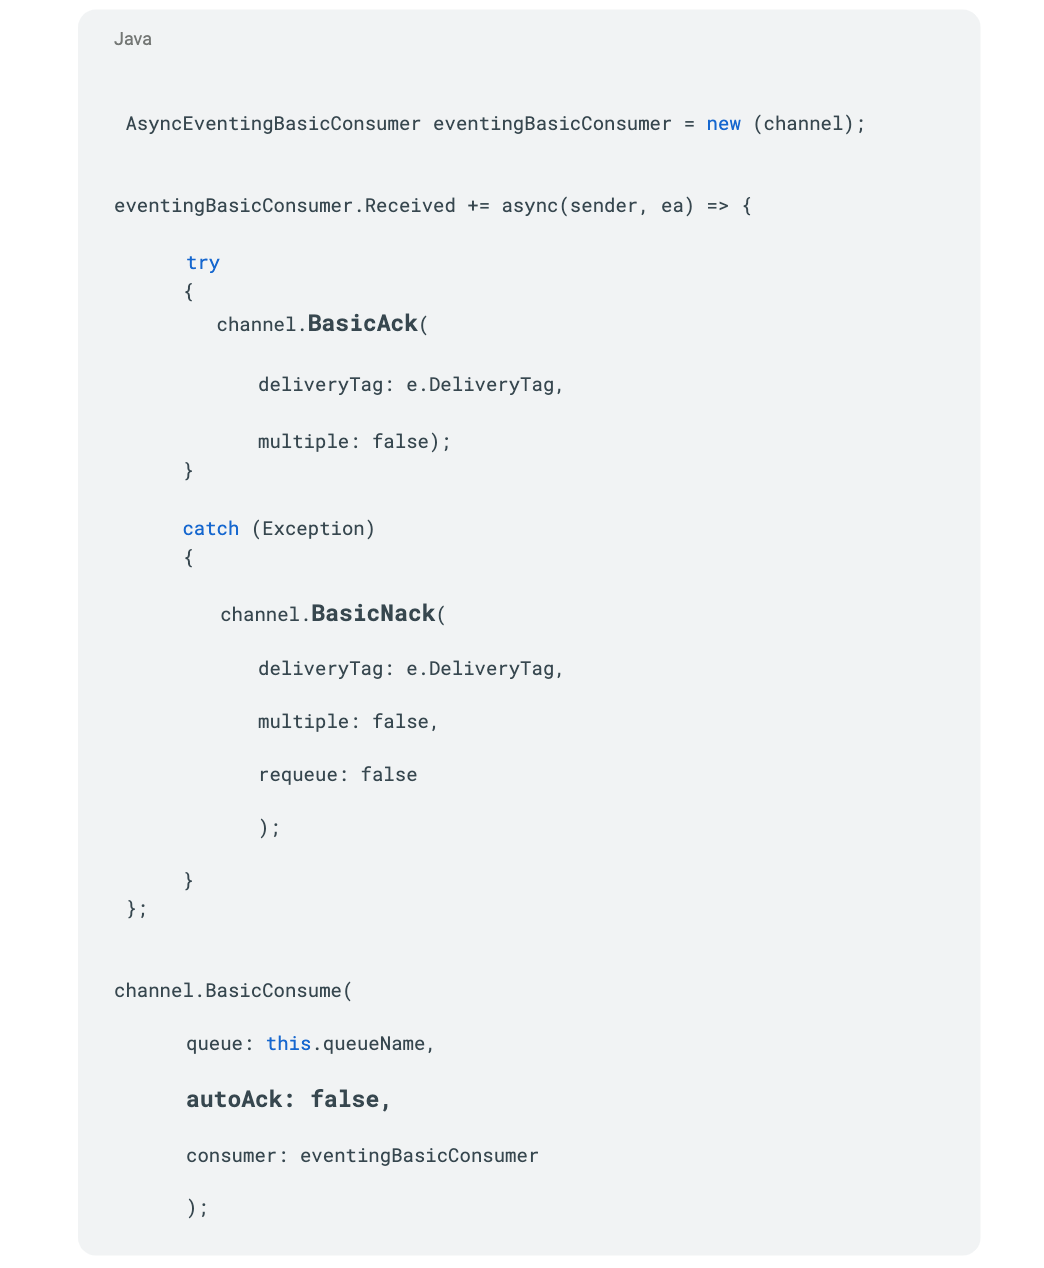
When autoAck is set to “false” in RabbitMQ, messages are not automatically acknowledged and removed from the queue upon delivery to the consumer. Instead, the consumer must manually acknowledge the message to signal that it has been processed and the message can be safely removed from the queue.
Negative acknowledgments in RabbitMQ have two possible outcomes: if the “requeue” parameter is set to “true”, the message will be requeued. If the “requeue” parameter is set to “false” and a dead-letter exchange is configured, the message will be sent to the dead-letter exchange.
We will be posting all code examples on our Sipod GitHub account in the future. You can find it here: https://github.com/sipodsoftware.
Tags: